Tabs

Pinterest

Showing posts with label show. Show all posts

Friday, May 13, 2011

Ellie who? Ellie the Elephant!


Happy middle of May to everyone. . . We are so close to being done with the school year and this year is my sons' last year of Jr High!  I can't believe he's going to the High School already, well I guess that just aged me a little for you all huh?  Anyway, this year my niece graduates High School so I'm off to Arizona at the end of this month to commence her high school experience and visit with my mom and brother.  Should be a hoot!
Enough of my goings on, off to my newest piece of greeting art and another Challenge or at Stamping with the Dragon with the super cute image called Ellie Elephant from our Sponsor; Di's Digital Downloads.  This challenge is a great one because it includes both a sketch and recipe (1 digi, 2 patterned papers, 1 embellishment)  
Prize: 5 digi images from store

So stop by the Stamping with the Dragon Challenge Blog for some DT inspiration and a super challenge!   I'm really anxious to see all of the entries and what your imaginations can come up with! 

I loved making this one for you all, it was a delight to do such a unique technique!


INGREDIENTS:
DP by Basic Grey called "Marjolaine"              
Spellbinders Nestabilities Classic Circle large and Scallop Large
Clear projector sheet from Office max
Bazzill Card stock


Challenges entered into include:
Crafty Creations ~ Anything Goes
Aud Sentiments ~ No Sentiments
Baby Bud Designs ~ die cuts
 Belli Challenge ~ S (sketch & satin)
Creative Inspirations ~ decorate inside
The Paper Variety ~ Movie theme ( Dumbo)
Crop Stop ~ shading w/copic
Stampin B ~ TGIF(scalloped,green,clear front,flowers)
Stamp n Doodle ~ Thank you
The Crazy challenge ~ Anything goes
The Stamping Boutique ~ circles
Scrap Creations ~ circles
Craft your passion ~ cutie patootie
MEDIUM:

Copic colors include:  C00, C2,C3,
B00,B000,
E47, Y02, Y11,Y17,
RV0000,RV00,RV13,
YG91,YG95,YG97
BV04,B21,B41


EMBELLISHMENTS:
Ribbon from stash (rules will be rules lol)


The inside was finished with a large writing space and a silky bow for that soft and finished look!  This is my first clear window covers on cards, the pictures just don't do it justice, it is just what a new mom to be would love to receive!

INSPIRATIONAL THOUGHT FOR THE DAY:

Commencements bring our future generations to us so we can realize our future!

Thank you for visiting,

Wednesday, April 13, 2011

Lovely La La

Happy hump day to all my friends and family ~  My Wednesday starts with coffee at my Sisters in-Law's house with the twins . . . I can't wait.  Gotta love age 3!  Never a dull moment.  LoL

On to my simplest piece of greeting art this week.  Darling Marcy is from the La La Land Digi pre-colored collection.  As it is getting really close to my next craft show, I need some of these quick but unmistakeably adorable cards to build up my inventory!  And the blog challenge is send them ALL your La La projects so the more entries the better chance.

Don't forget to hop over to Dragon Designs Challenge Blog for inspiration and a challenge I would love to see your creations.


INGREDIENTS:
Bazzill stock , Spellbinders Nestabilities die cut, and my hand made DP with a stamped oriental flower image from an undefinable source (the label is gone) sorry
Sentiment is digi from Crafty Sentiment

entered into La La Land Challenge ~ All your La La's

MEDIUMS:
Ranger Distress Ink ~ Tim Holtz Lipstick on background and Antique on Nestie
Water color paint orange, red, yellow
White Sharpie for freckles, and B000 copic for eyeshadow

EMBELLISHMENTS:
Tulips from Wild Orchid Crafts - original white hand painted w/water color
ribbon, tied with my new Bow-easy, from stash
Stickles is added to lips and shoes for that girly touch

The inside is covered with simple white paper.  This card was 15 minutes from start to finish TOPS!  Great fun and quick gratification.  Sometimes it's fun to have that quick fix lol (you know what I mean) *hugs*

Also, a card much deserving recognition, my monthly class with ScrapGirl Angie Hunt was both fun and educational this month. I've learned how to create the look of a silver platter with copics, how to keep a portion of the image outside the Nestabilities die cutter, the 5x5 half image card design and the bow-easy with distressed bias tape.  I shopped for product inventory and enjoyed every minute with some wonderful ladies in attending her class.  The design, once again, is all hers and the coloring is mine.  If you are a local Michigan crafter and need to learn some great techniques, I highly recommend this class as Angie is a real gem.

INSPIRATIONAL THOUGHT FOR THE DAY:
Do what TRULY makes you happy . . . you are the only one that will!
Thank you for visiting,


Tuesday, March 29, 2011

My Sunday Purse

Entered into Lily of the Valley Challenge, (punch it)
Belli Blog Challenge, "C" embellies
Crafty Creations "stiches"
Stampavie "gift bag"
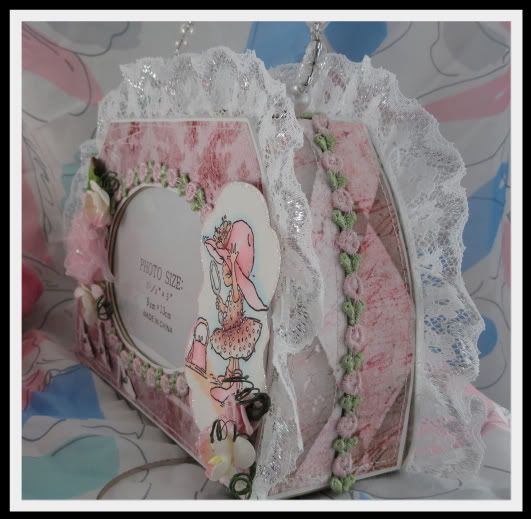
Happy Day . . .  to all the little girls out there!  I made this paper mache purse finally.  I bought it back in November and put it off and put it off, finally the perfect occasion!  I think it has been turned into every little girls Easter Sunday purse, time to put the white gloves and bonnets on Girlie's!  

The image is from Lili of the Valley called "New Hat".  The perfect image for this occasion.  The Challenge at Lili of the Valley is "Punch it", so keep reading and learn how I incorporated it in the project.  The Die Cut is by Nestabilities.


Ingredients:


The DP is "Vintage" from Tim Holtz Ideaology, the punch used is by EK (the little heals were
perfect for this theme). 


Medium:

Copic Sketch ~ Skin and Dress = E000,E00,E21, R20 and Y11 on the dress
Shading = B000, B00
Hair is C00, C5
Hat, shoes and purse = RV00, RV000 and R20


The purse opens up for storage and closes with a clasp, every DP is sewn with white thread and hot glued onto the purse.  The seam, when closed, is covered with the pink and green flower ribbon from my stash and don't forget to slide in your favorite image for display in your Easter deco spot!


Embellishment:

Handmade ribbon rose (see tutorial on my blog tab)
Bling "Salt Air" by Cosmo Cricket
Flowers from WOC
Ribbon and Lace from my stash
Stickles on flowers

INSPIRATIONAL THOUGHT FOR THE DAY:

Every opportunity to look your best is another reason to!

Thank you for visiting,

Saturday, February 12, 2011

Journal my Journey

Good afternoon, hope you all are staying warm!  This month I have a large craft show at Lincoln High School and need to get some items school kids can really use and love out!  So I bought these journals from the $1 basket at Michaels the other day, and at 50% off . . .woohoo!  I couldn't resist making them into something that a teenager couldn't pass resist writing their memories of the day into every single night! 
 

Challenges: Simon Says anything but a card challenge

Ingredients:  The Raising The Ceiling Collection - Ladybug Tilda Item Id: MAG208 by Magnolia was colored months ago so I don't have record of the Copic sketch colors used other than the face:  E00, E21, RV34.  The contour shading was done in Ranger Distress Ink as well around the edges in the background.  Karen Foster Design Paper was used behind Tilda.


You can barely notice, in picture, but the antenae are hand made from wire because this image is cut completely out and the hearts at the top were too heavy for the little piece of paper to hold up so I improvised  :)
I used a Martha Stewart punch and hand sewed "Texture Bobbin Ribbon into the punched holes to resemble a garden archway.   
  Special moments lady bug with yellow Stickles and a charm from Cousin trinkets nestled in a shiny bow evens out the symmetry. 


Recollections butterfly embellishment was used and a flower I cut with the Cricut machine back in December.    I never throw anything away, save the world one tree at a time!  The final touches were on the arch and the photo comes to life!  Recollections glitter chipboard stickers  added a contrasting swirl to this image that I couldn't resist and it brought out the postage cancellation image on the cover.

You can see in this photo that the antenae wires I used are bent forward slightly for depth.

This was a really fun project and I hope it's a hot seller at the craft sale!  Don't forget to use my tab called CANDY to load up before the finished dates.  As always, I love to share, ...and thank you everyone for the nice comments and suggestions. 

INSPIRATIONAL THOUGHT FOR THE DAY:
Look around you and see the needs of someone other than yourself ... you never know what could happen!

 Thanks for visiting, till next time . . .


Monday, February 7, 2011

My first Maggie Box

Hello Ladies,

I love this month, I have a craft sale coming up and I'm having the best time Maggie 'in up the items.  This turned out really cute and if it doesn't sell, I won't be sad, it has a spot saved on my dresser for it.  (You know what I mean!)  I can't wait to share the others with you, after I get caught up on all the CHA news, so excited to get the sew easy and other new stuff out there!  Have a great February!

Stamp Lovers Glittery Challenge


I've made my first box ever! Noble Tilda layered on with Copic colors E00,E21,E33,E35,E37,B32,BG05,BG10,BG15,BG18,RV00,RV34,Goo,G99,YG95. Loads of misc ribbon and pearls, Three bugs in a rug DP "Butterfly Kisses", "Star Dust" ranger stickles around the Cameo Ovations sentiment and her evening slippers. Prima "Cameo Roses" turquois and baby Pink "Fairy Tale" roses nestled behind Recollections blue Boutique Fleur butterfly Embellishments. Some Sizzix Flourish #10 was used in glitter paper to glitter up the edge. My first of 10 different items for my February craft sale. Well better get to the last of the Valentines cards, the 14th will be here before you know it. :)

INSPIRATIONAL THOUGHT FOR THE DAY:
You eventually reap what you sew, keep your thoughts kind!
Thanks for looking!

Tuesday, February 1, 2011

Craft this

~ Hello again, I wanted to share some photos of the projects I sold today in the craft show. I hope you enjoy looking as much as I enjoyed creating them.

The pocket photo albums: All of these were sold, Sorry Ladies! So easy to make and very inexpensive, Tilda can help you sell any product!

Love the Pirate


                             gotta get me a peach!


The Design Paper picture frames are made of paper mache, found them at Hobby Lobby, also very inexpensive but a little more tricky as far as making sure the slot for a photo is open and neatly glued:

So Romantic :)

My next craft sale was booked today for March 5th, then another one on May 7, being Mothers Day, I can't wait to create something that will make all the Moms out there feel loved and appreciated :)

INSPIRATIONAL THOUGHT FOR THE DAY:

If you make it, they will come!
Thanks for looking!


Friday, January 21, 2011

Valentine's frame

Hello . . here I am sharing again!  So this picture is a little better than the last, give me a week, I'll fix it eventually hehe!  Anyway, for Valentines day and the craft sale coming up, I wanted to show off this cutie in red!

I have a craft show coming up in February and I'm so excited to create a few new items with the Magnolia collection.  This frame is my first and I can't wait to try this item in several different colors, and then I want to make my first diary cover as well.  Maybe next week!  Would you buy one of these? :) ( of course you would, you love her too, afterall)

Thank you for visiting,