Tabs

Pinterest

Sunday, February 27, 2011

My Space

Good morning to all ...

So . . I'm what hubby calls frugal and practical?  Well, I might prefer being other things in his mind . . but it could also be much worse!  Hehe!  I'm putting my best foot forward . . . holding my breath . . . and showing the world my happy red and orange crafty space!  

It's only fair to prepare and share my journey here on my blog with the place every project begins :).   Some recent blessings in disguise have driven us to sell our home to own a VERY tiny home (under 600 sq. ft. total).  But without the 9 to 5 demand of a job, I am more able to accompany my autistic child through the grueling experience of Jr. High.   So it's a win ~ win.

Being a huge IKEA enthusiast and  making the most of my space, we sold the dining set and made sure there is room for my crafting spot in the kitchen. (there's no smiling with out it for me)

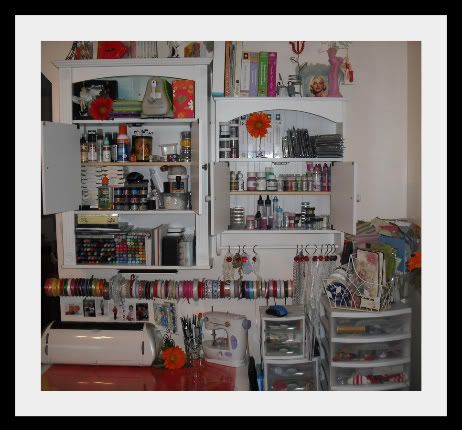
With my, "save the world one item at a time" motto, I crafted my desk from a dismantled table, particle board from the attic, poster of beautiful tulips and plexi glass.$20 TOTAL!   The ribbon holder is a tiny curtain rod .25cents at Walmart .  The cupboards are re-painted bathroom cabinets for $5 each from garage sales and the lace holders to the right are shower curtain hooks from the dollar store.   My most recent "frugal" buy is the CUTE and LITTLE sewing machine called the  EZ sew, adapter or battery powered. . . with a bobbin, reverse, 3 sizes of stitch and a light by WHITE from Joanne Fabrics for $30 on sale.


INSPIRATIONAL THOUGHT FOR THE DAY:

Happy . . . comfy . . . and creative,  all the ingredients of a successful craftier.  We all know when we're happy . . . we're more productive!

Keep stamping and creating!   After all, it's not about how much of something you have, or how much you spend to get it. To me, it's about what I can do with what I have and being proud when I succeed with it!

Thanks for visiting, come back and see me anytime!

You may also like: 

Friday, February 25, 2011

Pink Cream Birthday

This card was such a treat to make! Get it . . . TREAT! hehe

Ingredients:              
Stamps - House Mouse(Happy Hoppers)"You Snooze You Lose"
Inkadinkado (Sentiment)
Paper Foundations "Core dinations Canvas Texture in Vanilla Cream, April Lovely and Frappaccino
Design Paper by Pizzaz  from Michaels- "Faded Pink Flowers", "Asian Brushwork"


Mediums:
 Color Box fluid chalk I bought at the Sticker Store & More in Rouge,Peach Pearl,Yellow Cadmium
Tim Holtz - Ranger Distress Ink, Frayed Burlap,Fired Brick,Worn Lipstick,
Walnut Stain
Copic Sketch - E00,E11,E21,C00,C1,C3,C6,


Embellishments:
Doily from Jo-Ann Fabrics ,  Martha Stewart "Optic Dot" edge punch
Stickles - "Stardust" used on ice cream and flowers
Prima - Pink fairytale roses
Swigs - Spring Inspirations from my stash
Organza - Ribbon Trends from Hobby Lobby in Ivory, Pink and Gold


Challenges entered:
Simon Says (Coffee & Cream)
Cupcake Craft (Cake & Ice Cream)
Scrap Creations (Birthday Card)
Riley & Co (Brown plus 1 other color)
Truly Scrumptious (swirls & Pearls)
Stamptacular Sunday (Some One Special)
Stamp Something (flowers)


INSPIRATIONAL THOUGHT FOR THE DAY:

It's not how many birthdays we've shared with the world ...  What's important is that we still can!      I can't tell you how fun this sketch challenge was, a real HILL was climbed today, and I'm only still starting!
Thanks for visiting . . .until next time, keep stampin!

You May Also Like:


Thursday, February 24, 2011

Perfect in Purple

Good day everyone!  So... this versatile box is paper mache then covered and embellished, lined with satin and adorned with a garden of hand made flowers (see my tutorial tab) and ribbon, storing something valuable cha cherished would do any dresser justice..
before:
after:

INGREDIENTS:   
Design paper from Recollections "Purple Daze". Silk Ribbon, from my stash, was used on the edges to line the box.  After covering the box with Design paper . . . I Started off by covering the lid with a doily, then the die cuts from my Cricut "Sweethearts" cartridge then I added the flower spriggs and ribbon along with the hand made ribbon roses I made myself in order to bring a little bit of a personal touch .

I wanted to show the step by step process on video but I just couldn't get it done in time, to assure you of how easy this type of project can be I decided to give you a written tutorial.  The rim of the lid measures 1 3/8 inches the lid itself is approx 9 x 6 oval.  Tracing around the box lid on the wrong side of the dp gives you a quick and easy way of getting the trim accurate and remember that the top of the lid is covered first, then the rim so that any trimming can be done on top and the seam between the two papers can be covered with ribbon.
                                                                         
                                                                           Step 1
I used a permanent spray adhesive:   Elmer's Craft Bond 'extra strength' from Hobby Lobby.   Cozy Family Collection - Tilda With Cherries Item Id: MAG677  from Tilda from Magnolia was colored with Copic markers E00,E11,B32,B34,B41,C1,C3,C5,E33,RV13,. . . and Ranger Distress inks "Chipped Sapphire, Walnut Stain, and Wild Honey.
                                                                              
                                                                            Step 2 
I used hot glue with the 2 inch silk ribbon over all edges of the lid and the box being careful to not use too much glue and also to not leave too much ribbon untacked down, as the box will be opened and closed rubbing the two together.   
                                                                              Step 3

Embellishments:
Bows were designed and added almost as leaves to the ribbon lace flowers to stay with the flower looking theme.  At the top, four different roses were created by hand from the tutorial on my blog page and centered with Crystal Stickers Clusters from Hobby Lobby. The bottom flower was from a stem collection but I added a textured Bobbin Ribbon glued to the center for dimension.

This project is collection worthy and is going to be a great memory keeper.   Please enjoy this craft and don't be afraid to try it sometime. Thank you so much for visiting and I hope this inspires you to keep on keep'n on!

INSPIRATIONAL THOUGHT FOR THE DAY!

Our memories help mold and shape our futures!


You May Also Like:

Saturday, February 12, 2011

Journal my Journey

Good afternoon, hope you all are staying warm!  This month I have a large craft show at Lincoln High School and need to get some items school kids can really use and love out!  So I bought these journals from the $1 basket at Michaels the other day, and at 50% off . . .woohoo!  I couldn't resist making them into something that a teenager couldn't pass resist writing their memories of the day into every single night! 
 

Challenges: Simon Says anything but a card challenge

Ingredients:  The Raising The Ceiling Collection - Ladybug Tilda Item Id: MAG208 by Magnolia was colored months ago so I don't have record of the Copic sketch colors used other than the face:  E00, E21, RV34.  The contour shading was done in Ranger Distress Ink as well around the edges in the background.  Karen Foster Design Paper was used behind Tilda.


You can barely notice, in picture, but the antenae are hand made from wire because this image is cut completely out and the hearts at the top were too heavy for the little piece of paper to hold up so I improvised  :)
I used a Martha Stewart punch and hand sewed "Texture Bobbin Ribbon into the punched holes to resemble a garden archway.   
  Special moments lady bug with yellow Stickles and a charm from Cousin trinkets nestled in a shiny bow evens out the symmetry. 


Recollections butterfly embellishment was used and a flower I cut with the Cricut machine back in December.    I never throw anything away, save the world one tree at a time!  The final touches were on the arch and the photo comes to life!  Recollections glitter chipboard stickers  added a contrasting swirl to this image that I couldn't resist and it brought out the postage cancellation image on the cover.

You can see in this photo that the antenae wires I used are bent forward slightly for depth.

This was a really fun project and I hope it's a hot seller at the craft sale!  Don't forget to use my tab called CANDY to load up before the finished dates.  As always, I love to share, ...and thank you everyone for the nice comments and suggestions. 

INSPIRATIONAL THOUGHT FOR THE DAY:
Look around you and see the needs of someone other than yourself ... you never know what could happen!

 Thanks for visiting, till next time . . .


Tuesday, February 8, 2011

Maggie Valentine

I wanted to get in on ALL the Valentine Challenges but that would be impossible!  I searched for 20 minutes at least and came up with a lot of great red ribbons and Design paper to use for this card but they are all from my scrap box! (except the Tilda stamp), of course.  This card is being entered into the following challenges:
                                                                   
                                        7 Kids Challenge (hearts)
                                        Scrapping Stamping Challenge (Valentine)
                                        Just Magnolia (Anything + ribbon) week #92
                                        Magnolia-licious Highlights (hearts,pink, silver and white) Cupcake Craft Challenges also
                                         Stamptacular Sunday Challenge (hearts gone wild)


I know the rule of thumb is all about color and design with these cuties, but I am just starting my collection of Copics and the apron just became blue in my process of elimination. :)  I have some more coming in soon and it will help to broaden my horizons. hehe!


Thanks for stopping by and don't forget to check out all the candy  in my tab above, I've been visiting so many blog sites and making so many friends. 

INSPIRATIONAL THOUGHT FOR THE DAY:

Love them even when its not Valentines day.
Thanks for visiting,


Monday, February 7, 2011

My first Maggie Box

Hello Ladies,

I love this month, I have a craft sale coming up and I'm having the best time Maggie 'in up the items.  This turned out really cute and if it doesn't sell, I won't be sad, it has a spot saved on my dresser for it.  (You know what I mean!)  I can't wait to share the others with you, after I get caught up on all the CHA news, so excited to get the sew easy and other new stuff out there!  Have a great February!

Stamp Lovers Glittery Challenge


I've made my first box ever! Noble Tilda layered on with Copic colors E00,E21,E33,E35,E37,B32,BG05,BG10,BG15,BG18,RV00,RV34,Goo,G99,YG95. Loads of misc ribbon and pearls, Three bugs in a rug DP "Butterfly Kisses", "Star Dust" ranger stickles around the Cameo Ovations sentiment and her evening slippers. Prima "Cameo Roses" turquois and baby Pink "Fairy Tale" roses nestled behind Recollections blue Boutique Fleur butterfly Embellishments. Some Sizzix Flourish #10 was used in glitter paper to glitter up the edge. My first of 10 different items for my February craft sale. Well better get to the last of the Valentines cards, the 14th will be here before you know it. :)

INSPIRATIONAL THOUGHT FOR THE DAY:
You eventually reap what you sew, keep your thoughts kind!
Thanks for looking!

Tuesday, February 1, 2011

Craft this

~ Hello again, I wanted to share some photos of the projects I sold today in the craft show. I hope you enjoy looking as much as I enjoyed creating them.

The pocket photo albums: All of these were sold, Sorry Ladies! So easy to make and very inexpensive, Tilda can help you sell any product!

Love the Pirate


                             gotta get me a peach!


The Design Paper picture frames are made of paper mache, found them at Hobby Lobby, also very inexpensive but a little more tricky as far as making sure the slot for a photo is open and neatly glued:

So Romantic :)

My next craft sale was booked today for March 5th, then another one on May 7, being Mothers Day, I can't wait to create something that will make all the Moms out there feel loved and appreciated :)

INSPIRATIONAL THOUGHT FOR THE DAY:

If you make it, they will come!
Thanks for looking!


Magnolia-licious Challenge Entry

MAGNOLIA-LICIOUS CHALLENGE


Well, I'm new here and my stamps are limited ... so no couch or sofa, but the inspirational picture gave me a luxurious and elegant creme colored feel and the card I made for this challenge is creamy, pearly, and loaded with satin.  I hope you enjoy her, she is very comfortable just like anyone would be in the living space from the inspirational picture.
Thank you for visiting,